Skip to Main Content
Libraries
askus Ask us
 

Metadata Unit

Discard Process Using Pick and Scan in Voyager Cataloguing Module

[Dean Seeman / Gail Fowler – August 3, 2017 -- Latest rev. Feb. 11, 2022 re. clearing fines/fees–GLJ]

*IMPORTANT!  WHEN USING PICK AND SCAN, ALL MATERIAL MUST FIRST BE SCREENED IN PREVIEW MODE ONLY! (step 3.c.)  This will help to do a rough-sort of all material in hand & prevent items from being deleted automatically without having caught important retention notes.

**ALSO NOTE:  Pick and Scan is used with extreme caution in the case of serial material!  Please direct any discard requests involving known or suspected serial titles to Serials staff - email serials@uvic.ca with all information, indicating exactly which physical items (volumes/issues/complete set) are being discarded.

Discard Process Using Pick and Scan

Discard Process Using Pick and Scan in Voyager Cataloging Module

  1. Open the Voyager Cataloging module.  Under the File menu, select Pick and Scan (Ctrl+i).  You may see an error message.  Click OK.
  2. This will bring up the Pick and Scan window.  Under the first tab Changes to Make, under Delete (upper right corner), check Item (& click Yes to the warning message that will appear), then proceed to check Empty holdings, and Empty bibs boxes.
  3. Go to the Records To Change tab.
    1. Under Record Identifier, select Item Barcode.  (If there is no barcode, search for the record in the Voyager Cataloguing module, find the Item ID, copy it, and select Item ID)
    2. Under Perform changes against, select This item only.
    3. Under What to do, select Preview* – as stated at top, it is very important to first screen the items to look for important retention notes or error messages for each item.
  4. Place your cursor in the Identifier box and scan the barcode of the item you want to delete.  Scanning the barcode into the identifier box automatically enters it.  If you need to manually type in the barcode number, then you will need to either click on the check mark button (which will now be red), or hit Enter on your keyboard.
  5. A results screen will appear.  (see screenshot below)
*IMPORTANT:  Always look at the Free Text field of the results screen!  If it says:  DO NOT DISCARD. UVIC COMMITTED TO RETAIN UNTIL 2032 AS PART OF COPPUL SPAN Monograph, then this item must be retained!  Set it aside in a “RETAIN/DO NOT DISCARD” pile for return to shelf!  (Can be placed on metal shelves by Serials table for Stacks Maintenance staff)


  1. Scan the barcode of the next item you want to delete.  (You may need to place your cursor back in the Identifier box and highlight the previous barcode if not already)
    1. Only after you’ve confirmed there is no COPPUL SPAN/retention note, scroll down to the bottom of the results screen.  (see screenshot below)
    2. Ideally, there will be no COPPUL SPAN/retention note, AND the Update Item Status should say “Deleted.”  If this was the only item on the holding, then the Update Holding Status should also say “Deleted.”  And if this was the only item and holding on the bib, then the Update Bib Status should also say “Deleted.”  *Remember, NO records have actually been deleted yet, while still in Preview mode only.
    3. Set the item aside in an “OK to delete” pile - material that can later be deleted without incident, using Pick and Scan Update Database mode (ideally, this should be the majority).

*However, there are still several other possible error/warning messages you’ll need to watch for!  Set those items aside in a “Problems” pile.  See further down this document for a list of possible exceptions/”problems”, with instructions on how to deal with them.

  1. IF all criteria outlined above (steps 6.a-c) have been met, then you may proceed with deleting the items in your “OK to delete” pile, using Pick and Scan Update Database mode.
  • If you closed out of Pick and Scan, then you will need to repeat steps 1-3 to reopen  Pick and Scan, except this time, under the Records To Change tab: 
    • Under Record Identifier, select Item Barcode.
    • Under Perform changes against, select This item only.
    • Under What to do, select Update Database.
  • If you still have a Pick and Scan results screen open, then clear the last barcode from the Identifier box, and under What to do, change the selection to Update Database.

  • Place your cursor back in the Identifier box and scan the barcode of an item you already confirmed “OK to delete”.  *Remember, items will now be automatically deleted, while in Update Database mode.

  • Update Item Status should say “Deleted.”  If this was the only item on the holding, then the Update Holding Status should also say “Deleted.”  And if this was the only item and holding on the bib, then the Update Bib Status should also say “Deleted.”

  1. Finally, once the item has been truly deleted in Voyager, process for physical discard:
    1. Cross out barcode and call number label with black marker.
    2. Stamp “Discard” on title page (or cover for non-print material).
    3. Place on one of the Discard trucks in Room 260.  (In some cases, you may be instructed to route an item elsewhere instead.)

OTHER POSSIBLE EXCEPTIONS/”PROBLEMS” AND HOW TO DEAL WITH THEM:

If you get the error “Delete blocked.” at the bib, holding, or item status, there is a problem with deleting some part of the record.  This could be due to a number of factors and will usually occur at the holdings level.

NOTE:  For any of the following scenarios, you will be required to have access and permissions to the Voyager Cataloging and Circulation modules and have permission to edit bibliographic and holdings records.  If you are unfamiliar with these modules, DO NOT edit the bibliographic or holdings records!  Instead, insert a slip of paper into the item, noting For Deletion and the error message received, and pass this material on to the Metadata/Cataloguing Supervisor.

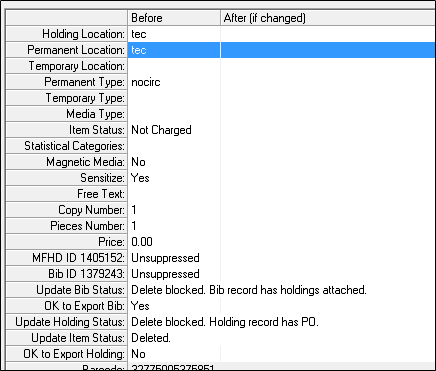
  • Update Holding Status says “Delete blocked. Holding record has PO.” (see screenshot below)  The holding cannot be deleted if there is a PO attached.  This means the bib record also cannot be deleted.  Instead, we need to code the record for deletion in the Cataloging module.

*NOTE:  The procedure of coding records for deletion differs for serial records!  Please direct any deletion/discard requests involving known or suspected serial titles to Serials staff.  (Bib record --> Leader --> Bibliographic Level = s : Serial)


Coding monograph records for deletion:

  1. Search for/Retrieve the bib record in the Voyager Cataloging module
  2. From the bib record, click Get Hldgs.  Select/Retrieve the appropriate holdings record
  3. From the holdings record, click Get Items.  Confirm a match to the item in hand and if yes, then delete the item record
  4. IF NO OTHER ITEMS ATTACHED TO THE HOLDINGS, then back in the holdings record:
    1. Click Suppress from OPAC
    2. Click Leader and change Record Status to d : Deleted
    3. In the 852 field, add  ‡x RECORD DELETED (no period) directly after the 852 ‡b location code, and delete all other 852 subfields
    4. Save to DB
  5. IF NO OTHER HOLDINGS ATTACHED TO THE BIB, then click Get Bib
    1. Click Suppress from OPAC
    2. Click Leader and change Record Status to d : Deleted
    3. Insert a 590 field in numerical order, both indicators blank, ‡a RECORD DELETED.  (with period)
    4. Save to DB
  • Update Item Status says “Unable to delete. Item has associated fine/fee.”  (see screenshot below)  The fine/fee must be cleared in the Circulation module before we can proceed with deletion/discard.


Clearing fines/fees before deletion:

  1. Copy the barcode of the item (only applicable if Pick and Scan results screen still open)
  2. Open the Voyager Circulation module and click Item, which brings up a Search box
  3. Paste/scan the barcode.  This brings up the Item Record window
  4. Under the top Item menu, select Outstanding Fines.  This displays a list of everyone who has a fine associated with that barcode
  5. Click on Patron Fines.  Look for your item barcode/title among the fines for that patron:
    1. If the fine is less than $20, proceed to step 6.
    2. If the fine exceeds $20, please email Nicole Herron (nherron@uvic.ca) indicating the barcode number and patron.  She will forgive the fine.  Once you hear that the fine is forgiven, proceed to step 6.
  6. Highlight item and click on Post.  Another screen will ask how to deal with that particular fine:
    1. Post Against: click on Selected (clearing the one item highlighted, not all the patron's fines)
    2. Posting Type: from dropdown menu, select Forgive
    3. Description: type in the reason for forgiving the fine, with your initials (e.g. Forgive for item deletion--GLJ )  Then click OK
  7. Close the Patron Fines/Fees screen, which takes you back to the Outstanding Fines for this Item screen.  Repeat the process (steps 5 to 7) for each patron with fines on the item
  8. Once all fines for the item have been cleared, Close the Outstanding Fines for this Item screen
  9. Go back to the Cataloging module and delete the item by using Pick and Scan steps 7-8
  • Update Item Status says “Unable to delete. Item is currently blocked.”  (see screenshots below)  There could be a couple different reasons for this error:

  1. Look at the Item Status field.  If it says “Charged”, then the item may simply need to be discharged before you can proceed.  Open the Voyager Circulation module and Discharge the item.  Go back to the Cataloging module and try to delete the item using Pick and Scan steps 7-8


  1. If the Item Status field says “Not Charged”, then it could be that someone had requested a search to look for the missing item but it was not found, eventually declared lost or missing.
    1. Go to the Access Services desk and ask them to remove the call slip for the item
    2. When Access Services notifies you that they’ve removed the call slip, wait until the next day before trying to delete the item using Pick and Scan steps 7-8.  Sometimes you may need to wait longer (for the call slip process to finish)


  • Update Item Status says “Unable to delete. Item has been logged in a transaction exception.”  (see screenshot below)  If this is the case, a report needs to run overnight so try deleting this item the next day.

Creative Commons License
This work by The University of Victoria Libraries is licensed under a Creative Commons Attribution 4.0 International License unless otherwise indicated when material has been used from other sources.