[Last revised: Jan. 28, 2019 - GLJ]
Creating item records in Voyager generally involves adding a barcode and selecting an Item Type. The Item Type combined with the Patron Type determines the loan period of the item.
The default Item Type of an item record comes from the type set in Voyager Cataloging Module, under: Options → Preferences → Item Defaults (Alt OPI). It is usually set to Item Type "book". You can change the default here if you are creating a lot of item records of the same type. Remember to set it back to "book". Also make sure the default Copy number is set to “1”.
Voyager uses 2 sets of codes to indicate location and item type. The Location Code is a unique lowercase code of 2 to 8 characters. Some examples are: main ; arc ; arc,sto ; sc ; sc,the. The Location Codes each have a corresponding Location Name and OPAC Display. These Location Codes are used in the Holdings record field 852 subfield ‡b.
e.g. 852 0 / ‡b main ‡h D753 ‡i S75 ‡i 1998
The Item Type is a unique code which, along with the Patron Type in Voyager Circulation Module, determines the loan period for that item. Some examples of Item Type are: 3 day reserve item; book; cd; map; score.
In an item record, the Title, Location and Call # appear as header information. This information comes from the Bibliographic and Holdings record and cannot be changed from within the Item record (the header information fields are greyed out). If the bib title, holdings location or call number are changed from within the Bib or Hldgs records, then this information will automatically change in the header of the Item record.*
The Item Type and Copy number come from the default values set in Options → Preferences → Item Defaults (Alt OPI). The “Perm. Loc.” Permanent Location comes from, and should always match, the location name corresponding to the location code recorded in the Holdings record field 852 subfield ‡b. If needed, a Temp. Loc. and Temp Type may be established.
*NOTE: If the Holdings record location code is changed (i.e. in the case of transfers), only the greyed out header Location field changes in the Item record(s). Any and all Item records linked to the changed Hldgs record will also need to be edited so that the Perm. Loc. field matches the greyed out header Location field. See Item Records Procedures for more details.
[Last revised: Dec. 6, 2019 - GLJ]
Creating an item record:
Logon to Voyager Cataloging Module.
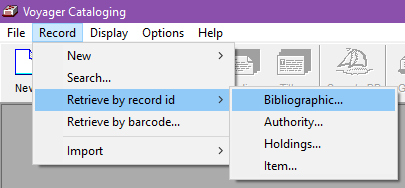
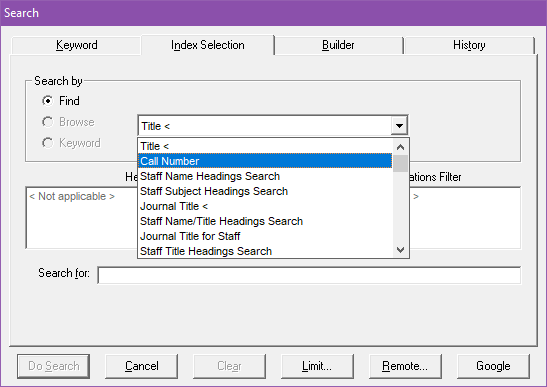
If you know the Bib ID number, retrieve the Bib record by selecting Record → Retrieve by record id → Bibliographic (Alt RIB or F5). Otherwise, do a Search by Call Number or Title. Compare the material against the Bib record to ensure you’ve brought up the correct record.
From the Bib record, click the Get Hldgs icon or select Record → Retrieve Holdings (Alt RH or Ctrl+R). If there is more than one Holdings record attached to the Bib record, be sure to select the correct Holdings record.
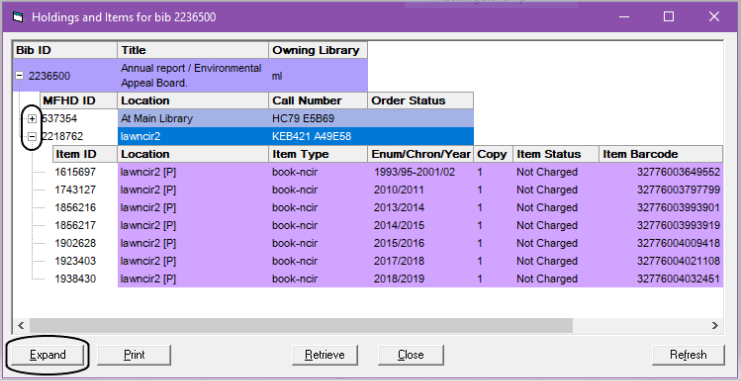
With the desired Hldgs record as your active window, click either the Hierarchy icon or the Get Items icon to first make sure your item doesn’t already exist. The Hierarchy view shows all Hldgs/MFHD records and Item records associated with the Bib record, whereas the Get Items view shows only those Item records linked to the active Hldgs record.
In Hierarchy view, click the +/- signs or the Expand/Collapse button to expand/collapse list views. Close the window to get back to the Hldgs record.
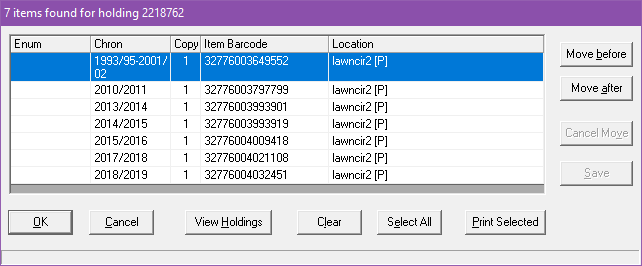
In Get Items view, there is a little less information displayed (no Item record ID number, Item Type, or Item Status columns). However, you are able to toggle the Item records up or down, should you notice something out of sequential order. (Be sure to Save any desired changes) Click Cancel to get back to the Hldgs record.
So long as your item doesn’t already exist, from the Holdings record, click the New Items icon or select Record → Create Items (Alt RT). A default Item record will appear and the cursor will be flashing in the Barcode field ready for scanning.
Scan in the barcode, complete other appropriate fields as desired (making sure the Item Type and Copy number are set correctly), and click the Save to DB icon to save the new item record to the database (Alt RV or Ctrl+B). The title bar at the very top of the Item record window will now show an Item record ID number (e.g. Item 103796 for holding 101876).
Click the Hierarchy icon to ensure all looks well, confirming consistency if multiple item records are linked to one Holdings record. Close the item record window to get back to the Holdings record, and repeat Steps 4 through 6 for each additional new item record desired.
Editing an item record:
REMEMBER: If the Holdings record location code is changed (i.e. in the case of transfers), only the greyed out header Location field changes in the Item record(s). Any and all Item records linked to the changed Hldgs record will also need to be edited so that the Perm. Loc. field matches the greyed out header Location field. The Item Type may also need to be changed.
Logon to Voyager Cataloging Module.
If you have the item in hand and it has a barcode, retrieve the Item record by selecting Record → Retrieve by barcode (Alt RB). Otherwise, retrieve or search for the Bib and Hldgs record. From the Holdings record, click the Get Items icon or select Record → Retrieve Items (Alt RM or Ctrl+T). Another option is to click the Hierarchy icon, click the + signs to expand views, and select the desired item record.
Edit the appropriate fields as desired (making sure the Item Type and Copy number are set correctly), and click the Save to DB icon to save the revised item record to the database (Alt RV or Ctrl+B).
Click the Hierarchy icon to ensure all looks well, confirming consistency if multiple item records are linked to one Holdings record. Repeat the steps to edit any other affected item record(s).
NOTE: The barcode field will appear greyed out, but can still be changed as needed. Click the little box of ellipses (3 dots) to do any of the following:
Add a barcode number to an item record that may have initially been created without one
Add a second barcode number when necessary
Change an existing barcode number (scan the new barcode to become the Active barcode, then highlight the Inactive barcode and click Delete. Inactive barcodes may also be retained in the item record, if desired)
Section is under review
Most locations and item types are very straightforward; for those used less frequently, please see the table below, outlining the various codes to use on the item record; for labels, please check the Location Code and Rubric Table.
One rubric used which is not a location is “OVERSIZE” (previously 'o/s'). In the holdings record it is indicated by ‡i OVERSIZE as the last element of the call number, but the rubric goes at the top of the call number on the verso t.p. and call number label. For more details see Oversize books.
No item records are created for items going to Readings Rooms, as they do not get barcodes.